Register
Themes should have a register component to allow customers to create accounts.
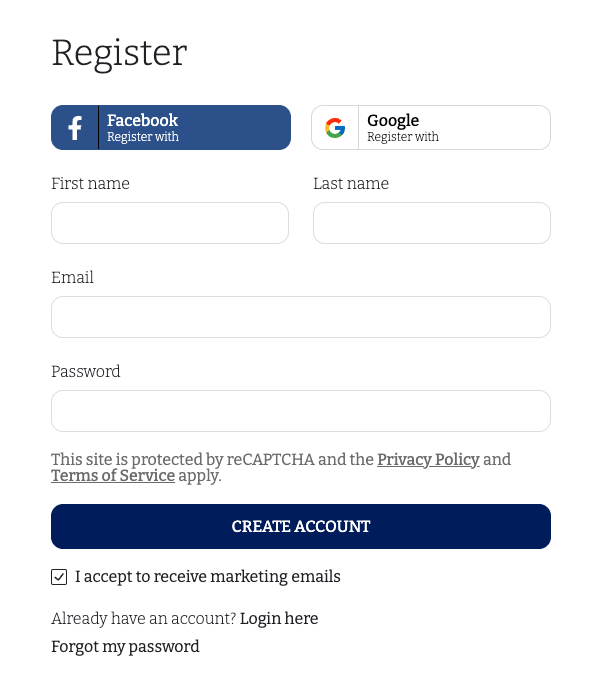
Here is the full source code. Here is how our register component looks like;
RegisterForm
The logic of register is contained within our theme's custom hook useRegister. It starts by creating an instance of the RegisterForm class as a state variable.
...
 const [form] = useState(
    new RegisterForm({
      message: {
        requiredRule: t(`${NS}:formMessage.requiredRule`),
        emailRule: t(`${NS}:formMessage.emailRule`),
        minRule: t(`${NS}:formMessage.minRule`),
      },
    })
  );
...
RegisterForm class contains all the state and validation needed for the register process. It requires 3 error messages to be passed to its constructor; requiredRule, emailRule and minRule. These error messages will be passed back to you later, if a form item has a validation error.
- requiredRule message should indicate that the merchants have to fill the field.
- emailRule message should indicate that the merchants should provide a valid email address.
- minRule message should indicate that the merchants should provide a password with at least 6 characters.
You will see that for all account pages, there is a corresponding Form class to do validation, hold state and call APIs for you. All form classes has the same usage.
Setting Values
We use the fields from the RegisterForm on each form element, both to set the value of the input and to show validation results.
<FormItem label={t(`${NS}:form.firstName`)} help={form.firstNameErrorMessage} status={status.firstName}>
  <Input
    status={status.firstName}
    value={form.firstName}
    onChange={(event) => form.onFirstNameChange(event.target.value)}
  />
</FormItem>
As you can see, the value of the input is tied to the firstName field of the form, and the onChange event is tied to the onFirstNameChange callback function of the form.
Here are all of the fields contained in the RegisterForm class and their corresponding functions to set their values;
- firstName field with onFirstNameChange
- lastName field with onLastNameChange
- email field with onEmailChange
- password field with onPasswordChange
- isMarketingAccepted field can be set directly on the field. This field can be used to ask for customer consent for email marketing.
Form Validation
The validation of these fields will be triggered when you call the register function of the form. This function checks for the validation errors and sets the appropriate error messages on the form fields. For example; if your firstName field was empty, it would set the form.firstNameErrorMessage to the requiredRule text you provided before. You can then use these error message texts to display the error to the merchants. Here are all the fields for the validation error messages;
- firstName field with firstNameErrorMessage
- lastName field with lastNameErrorMessage
- email field with emailErrorMessage
- password field with passwordErrorMessage
Note however, to check if the email provided already in use for another account, you need to call the store.customerStore.checkEmail function manually. RegisterForm only does basic validations.
If all of your form fields are correct, the register function will call the necessary API to complete the register process. If the process is successfull, the merchant will also be automatically logged-in, and you can redirect the merchant to any page on your theme.
Captcha
ikas merchants can enable the google captcha from their dashboard's storefront payment and other settings page.
Dashboard Navigation Menu > Sales Channels > Storefront > Payment Settings
Captcha logic for our theme is in the GoogleCaptcha sub-component. This component first checks the store.customerStore.isCaptchaRequired field to see if the merchant has enabled the captcha. If enabled, it renders the GoogleCaptcha component imported from the @ikas/storefront package.
It also renders the google's privacy policy text and link. Since the design for your theme might be different, we do not provide a built-in component for the texts and the links, but you must put these links and texts to your component.
The text and the links you need to render is:
This site is protected by reCAPTCHA and the Privacy Policy and Terms of Service apply.
Rendering the GoogleCaptcha component and the privacy texts and links is the only thing you need to for captcha. Here are all of the features that you can use the captcha for;
- Login
- Register
- Forgot Password
- Recover Password
- Contact Form
- Check Customer Email
Navigating After Register
After a successfull register, you need to navigate the merchant to a page of your theme. However, you need to first check the redirect field of the RegisterForm to see if you need to redirect to a specific URL. If the merchant navigates to the register page with redirect url query param (/register?redirect=some-url), this field will be filled. Depending on its existence, you need to either redirect to the value of this field, or to a page of your theme. Here is how its done in our theme;
setTimeout(() => {
  if (form.redirect) {
    router.push(decodeURIComponent(form.redirect));
  } else {
    router.push('/account');
  }
}, 1000);
The main use case for this query param is the checkout page. It redirects the merchants to the login/register pages to create an account or login before they complete their session. After a successfull login/register, the merchant should be redirected back to the checkout. It is the theme developer's responsibility to redirect the merchant back by using this redirect field.